Monday, January 10, 2011

Sugar Pops

"Just a spoon full of sugar helps the medicine go down."-Mary Poppins

This all so familiar lyric simply states that in our hardest task can also be found a morsel of goodness.  The most common morsel of goodness: sugar.

People first learn that sugar is good when first born through mother's milk.  From then on we seek this energy giving flavor.  Early humans found this sweetness in the form of fruit, honey and maple syrup.

The History
The word sugar is derived from sharkara, which is Sanskrit for gravel or small chunks of material.  When sugar started to be refined, the major source was sugar cane, Saccharum officinarum, originating in New Guinea.  Prehistoric humans carried the sugar cane into Asia.  It was the Indians that first refined the sugar sometime before 500 BC.  This was done by boiling down the juice pressed from the cane into raw sugar crystals coated with a dark syrup, called gur.  Later on, around 350 BC, Indian medical journals were describing ways to wash the dark syrup off of the crystals creating refined white sugars.

As the centuries passed, nomads and conquering nations carried sugar west to Persia, then further on to northern Africa and then all the way to Spain.  It was Arab cooks that were the founders of taking sugar to a new level by making different concoctions with sugar (e.g. marzipan paste, flavored syrup) and using it as a sculpting medium.

The Crusades in the 11th century introduced sugar to the Europeans.  It was first treated like any other spice from the Middle East, as a flavoring and medicine.  Apothecaries used it to mask the bitterness of their medicines as well as serve as a medium for delivery.  (Again, referring to those two spoons of sugar).

It is believed that a French druggist made the first non medicinal treat in around the year 1200.  He simply coated almonds with sugar.  Europeans started using sugar to flavor different main course dishes and later on, desserts.

Infatuation with sugar and the colonization of the west spread sugar cane over a larger area making it more readily available.  The use of slaves to cultivate the sugar is believed to be a major force behind drive of the expansion of slavery.  The abolishment of slavery in the United States and Britain began the downfall of big sugar industries.

Another downfall came from the invention of the sugar beet.  The sugar beet can be grown in northern climates making sugar even more readily available.  The sugar beet didn't really gain popularity until Napoleon Bonaparte sought out more ways to free France from dependence on English commodities, sugar being one of them.

Today sugar beets make up 30% of sugar in the world, Russia, Germany and the United States being the major growers.  India and Brazil are the major growers of sugar cane.

The Science
All sugar is made of three atoms; carbon, hydrogen and oxygen.  These three atoms can be rearranged to make different forms of sugar: glucose, maltose, fructose, lactose and sucrose.


Glucose, which goes by a couple of other names; dextrose and "blood sugar", is what provides energy to living cells.  It's the most common of the sugars and it also provides the base for starch to form.  The most familiar form at the grocery store is corn syrup.


When two glucose molecules combine, they form maltose.  Maltose, or malt sugar, is mainly found in grains, like barley.  It is an important part of the beer brewing process.  It is the food for yeast that leads to the production of ethanol and carbon dioxide.


Fructose has the same chemical equation as glucose, just with a slightly different structure.  It is found in fruits, vegetables and honey and is the sweetest of the sugar family.  It tends to metabolize more slowly than the other sugars, which means it is more preferable for diabetics since it raises the blood glucose level more slowly as well.


Lactose is the sugar found in milk.  When ingested, the body produces a chemical called lactase that will break the lactose down.  In some people, the production of lactase decreases with age creating an intolerance to lactose.


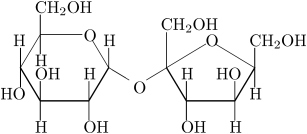
The star of the show is sucrose, or table sugar.  It's made when the glucose molecule and the fructose molecule bond.  It is sucrose that we extract from sugar cane and sugar beets.


The shape of all these molecules form the backbone of cooking with sugar.  These crystal formations are a fortress that can withstand a high amount of abuse while at the same time playing well with others.  It mixes well with water and can be boiled down so that each crystal will bond with eachother creating larger crystalline structures.


Once mixed with water and heated, the water concentration decreases allowing the temperature of the mix to increase.  The higher the temperature, the more crystals bond together forming a harder end product.

17th century confectioners developed a system for categorizing the stage at which the desired consistency is achieved.  These chefs must have had fingers made of asbestos because they would check for doneness by rolling it in between their fingers.  Later they would observe the reaction after they dropped a piece of it into a glass of water.  The sugar would cool quickly and show immediately how large the crystal formation became. This showed the ball or candy stages.

  • 230 to 235 degrees is the thread stage.  This stage is just right for syrups.
  • 235 to 240 degrees is the soft ball stage.  This consistency is desirable for fudge.
  • 245 to 250 degrees is the firm ball stage.  This is great for divinity and other chewy candies
  • 250 to 265 degrees is the hard ball stage. This the stage you want for marshmallows.
  • 270 to 290 degrees is the soft crack stage.  People in Atlantic City seek this stage for their salt water taffy.
  • 300 to 310 degrees is the hard crack stage.  This is the stage wanted for hard candies such as lollipops.
  • 320 to 360 degrees is the caramel stage.  This is when the molecules finally break apart and form a whole new palette of flavors.  This is also the point that is pretty tricky, the line that separates caramel from burnt is extremely thin.

The Dish
One of the first things to come to mind when talking about sugar is hard candy or lollipops.  If you were to check out trending topics right now in pops, you'll see Wilton's cake pops, a delectable combination of cake and lollipops!

I wanted to go a step further.  Another great confection-on-a-stick is a bright red (or caramel covered) candied apple.  So, I decided to make a hybrid of the candied apple and Wilton's cake pops.

The Recipe
My goto recipe for an apple cake is America's Test Kitchen's Applesauce Snack Cake.  It has a trio of apple-y goodness in the forms of apple cider, dehydrated apples and applesauce.  (Note: I didn't have any applesauce when I made this, but I did have plenty of fresh apples, so I quickly peeled, chopped and cooked down the apples with some apple cider and a little cinnamon to make the requested 1 cup of applesauce)

Applesauce Snack Cake
from the Episode: Easy Apple Desserts

This recipe can be easily doubled and baked in a 13 by 9-inch baking dish. If doubling the recipe, give the cider and dried apple mixture about 20 minutes to reduce and bake the cake for about 45 minutes. The cake is very moist, so it is best to err on the side of overdone when testing its doneness. The test kitchen prefers the rich flavor of cider, but apple juice can be substituted. Cooled leftovers can be wrapped in plastic wrap and stored at room temperature for up to 2 days.

Makes one 8-inch square cake
3/4 cup dried apples (2 ounces), cut into 1/2-inch pieces
1 cup apple cider
1 1/2 cups unbleached all-purpose flour (7 1/2 ounces)
1 teaspoon baking soda
2/3 cup sugar (4 3/4 ounces)
1/2 teaspoon ground cinnamon
1/4 teaspoon fresh ground nutmeg
1/8 teaspoon ground cloves
1 cup unsweetened applesauce , room temperature
1 large egg , room temperature, lightly beaten
1/2 teaspoon table salt
8 tablespoons unsalted butter (1 stick), melted and cooled slightly
1 teaspoon vanilla extract
  1. Adjust oven rack to middle position; heat oven to 325 degrees. Cut 16-inch length parchment paper or aluminum foil and fold lengthwise to 7-inch width. Spray 8-inch square baking dish with nonstick cooking spray and fit parchment into dish, pushing it into corners and up sides; allow excess to overhang edges of dish.
  2. Bring dried apples and cider to simmer in small saucepan over medium heat; cook until liquid evaporates and mixture appears dry, about 15 minutes. Cool to room temperature.
  3. Whisk flour and baking soda in medium bowl to combine; set aside. In second medium bowl, whisk sugar, cinnamon, nutmeg, and cloves. Measure 2 tablespoons sugar-spice mixture into small bowl and set aside for topping.
  4. In food processor, process cooled dried-apple mixture and applesauce until smooth, 20 to 30 seconds, scraping sides of bowl as needed; set aside. Whisk egg and salt in large bowl to combine. Add sugar-spice mixture and whisk continuously until well combined and light colored, about 20 seconds. Add butter in three additions, whisking after each. Add applesauce mixture and vanilla and whisk to combine. Add flour mixture to wet ingredients; using rubber spatula, fold gently until just combined and evenly moistened.
  5. Turn batter into prepared pan, smoothing top with rubber spatula. Sprinkle reserved 2 tablespoons sugar-spice mixture evenly over batter. Bake until wooden skewer inserted in center of cake comes out clean, 35 to 40 minutes. Cool on wire rack to room temperature, about 2 hours. Run knife along cake edges without parchment to release. Remove cake from pan by lifting parchment overhang and transfer to cutting board. Cut cake and serve.


The next step was to make the coatings:


1 cup water
1/2 cup corn syrup
2 cups sugar
1 teaspoon cinnamon flavoring
1 teaspoon red coloring

Boil water, syrup, and sugar together until a brown caramel color is reached (at about 250 degrees F on a candy thermometer). Remove from the heat and add cinnamon and red coloring. Cool slightly.

This is where the science of candy making comes into play.  The sugar/corn syrup/ water solution gets taken up to the firm ball stage for a chew candy consistency.  While boiling, it is best to keep the lid on so the condensation rolls down the side of the pot or to keep washing the sides of the pot with a wet brush.  The side of the pot is cooler than the base and crystals prematurely form.  If these crystals get into the solution, they’ll throw the balance off.

Adding corn syrup to this solution also helps control the crystal formation since it is mostly glucose.  Glucose is almost the same as the sucrose, but not quite.  It is different enough to create a sort of impurity which slows the formation of the crystals making this recipe easier to control.

Caramel Coating (recipe from Kraft Caramel package)

1 pkg. (14 ounce) KRAFT Caramels (about 50)
1 tablespoon water

Microwave caramels and water in large microwavable bowl on HIGH 2 1/2 to 3 minutes or until caramels are completely melted, stirring after each minute.

Note: I reduced this to a quarter of the package and a splash of water.

The Method
After the cake was cooled, I took half the cake and broke it into crumbs, then mixed in about a quarter cup of Wilton's decorator icing.


Using a #24 disher (3 1/2 tablespoons), I portioned out and rolled the cake/frosting mixture into balls and firmed them up a little in the freezer.


After about 20 minutes, I melted a few squares of Kraft Caramels and dipped the sticks in before inserting into the cake balls.  The solid caramel not only is a happy surprise in the center of the pop, but is a multitasker acting as a glue to bond the stick to the cake.


Knowing that both the caramel and the candy coating are going to be at a cake-pop-melting 250 degrees, I froze the pops for about two hours to reduce the loss from the melt.


Finally, I coated half the balls with the caramel and the other half with the candy coating.


Eat, Enjoy, Repeat!


Further Reading/Bibliography
  1. Brown, Alton, Good Eats: The Early Years,New York, NY,Stewart, Tabori & Chang,2009
  2. Corriher, Shirley O., Cookwise: The Hows and Whys of Successful Cooking, New York, NY HarperCollins, 1997
  3. McGee, Harold, On Food and Cooking: The Science and Lore of the Kitchen, New York, NY,Scribner, 2004

Monday, May 3, 2010

Stuck on You

On the last full weekend in April the people of Shepherd, Michigan celebrate the seasons bounty that’s been collected since February.  This bounty is Maple Syrup.  People know it best by the condiment they put on pancakes or French toast, but real maple enthusiasts know it has much more value than that.

The History
Maple Syrup was collected by Native Americans long before Europeans were collecting honey and long before North American history was written down.  The tribes, specifically the Algonquin, Iroquois, and Ojibwas, have many myths on how maple syrup came to be.

The people of these tribes considered the golden elixir to be an important part of their diet.  They drank the sap, boiled it down for sugar, mixed the syrup into bear fat, or even corn meal.  They celebrated the beginning of maple season with an energetic dance during the first full moon of the season (known as the Maple Moon or Sugar Moon) in thanks to the gods that gave them this treasure.

They slashed a V into the maple tree using their tomahawks and inserted a wood chip so it remained open.  The sap was collected in sheets of elm bark or clay containers.  It was allowed to freeze, then the ice was removed leaving behind the concentrated syrup or they dropped red hot rocks into it boiling off the water.

In the middle of the 16th century, these tribes would use the sugary concoction to trade with Europeans just showing up in their area.  They also taught these new people the trade of sugaring.

Since cane sugar from the West Indies was heavily taxed and more for the rich, colonists used the maple syrup and sugar in everyday cooking.  They would work day and night during sugaring season to make the syrup into cakes, which was easier to store and would last the rest of the year.

As cane sugar and eventually beet sugar became cheaper and more available, maple sugar became less and less desired.

The Process


Maple Syrup is made from the sap of the Sugar Maple Tree (Acer saccharum).  This tree is indigenous to southeastern Canada and northeastern United States.  The province of Quebec is the largest maple syrup producer in the world, about 81% of the world's syrup comes from Quebec.  They are followed by Vermont (5.5%), Ontario and Maine (3.3% each)

The sap starts flowing when the nights are below freezing and the day is above freezing.


Traditionally, the trees are tapped with a drill when the temperature gets above freezing (drilling through frozen bark and/or wood can split and damage the tree) and a spout is inserted and a galvanized bucket is hung to collect the sap.

The sap buckets must be collected at least once a day to prevent spoiling.  Tapping also must only be done on mature, healthy trees.  Usually the tapping process won't hurt the tree as it will keep growing right over the old tap hole.  Some trees are large enough, they can handle multiple taps.  

Companies that collect from a large amount of trees employ plastic tubing from the trees that lead toward a main tank

The sap is then boiled so that most of the water will evaporate out thus creating syrup.  Maple sap is 97% water, whereas maple syrup in the end only contains about 34% water.  To achieve the proper boil, the sap is heated to about 7 degrees above the boiling point of water.  This temperature can change with many variables (e.g. elevation, barometric pressure, humidity, etc.).  Since it takes about 40 gallons of maple sap to produce one gallon of maple syrup, the process creates a lot of steam which is why maple syrup producers have a dedicated building for this process.  Doing this on a kitchen stove will cause some problems.

The syrup is then sent through a series of filters to remove the "sugar sand" (concentrated minerals and organic acids found in maple sap) then graded and bottled.


The Flavor and Grading

Maple syrup contains 65% sugar, comprised of 63% sucrose and the rest being glucose and fructose.  It also contains 34% water and 0.5% malic acid and other acids.  Sweetness is the primary flavor of the syrup, the acids give it a slight tartness and the wood itself naturally creates a by-product called vanillin (this is what makes imitation vanilla).  The longer they syrup is boiled, the more the sugars caramelize and the more the water is reduced.  This creates a deeper more intense maple flavor.

The US Department of Agriculture has defined two grades of maple syrup, A and B.  Although there are multiple levels of grade A: light amber, medium amber and dark amber.  The grade is determined by the sugar content, flavor and color.  Sugar content can be measured by a hydrometer (which is actually measuring it's specific gravity, which is the ratio of density of the liquid to the density of pure water), and the color can be determined by measuring how much light penetrates through the syrup.  The more light that passes through the higher the grade.

Grade A Light Amber (or Fancy) has a very delicate flavor and is the lightest in color.  Grade A Medium Amber has a delicate flavor, while Grade A Dark Amber has a more distinct flavor.  Finally, Grade B has a strong flavor and is very dark.

Maple Syrup is also nutritious.  It has a higher amount of calcium than milk and of all sweeteners has the lowest amount of calories.  It also contains iron, potassium, magnesium, phosphorus, trace amounts of amino acids, proteins, riboflavin (which is vitamin B2), pantothenic acid (vitamin B5), and niacin.

The Dish

Maple syrup is much more than just a pancake topper.  The unique maple flavor lends it to many different applications from pouring it on top of iced cream, to mixing it with vinegar and oil and making a salad dressing, to mixing it with caramel and making maple caramel popcorn.  It can even be used in a savor dish;  The Black Sheep Sugarhouse in Orleans, Vermont has a chicken wing recipe developed by Kathy Desmarais, that is delicious.  This dish is probably best using a grade B syrup, since the flavors are deeper and can withstand the cooking process better.


The Recipe


Maple Marinated Chicken Wings

3 lbs. chicken wings
3/4 cup soy sauce
1 1/2 tsp ground ginger
1 tsp ground mustard
1/4 tsp garlic powder
1 1/2 tbsp maple syrup
1 tsp dried chives

Cut tips off chicken wings and pierce each wing with a fork.  Mix remaining ingredients in a separate bowl; reserve some sauce for basting wings during cooking.  Place a layer of wings in a bowl or baking pan. Pour enough marinade over wings to coat them.  Continue to add layers of wings and marinade one layer at a time, until all of the sauce is used.

Cover and refrigerate for at least 4 hours.  Remove from refrigerator.

Preheat oven to 375ºF.  Arrange wings on foil-covered baking sheet.  Use a pastry brush to paint each wing with a dab of the reserved sauce. Bake for 45 to 55 minutes.

Variation: For those of you who watch your salt intake, substitute reduced-salt soy sauce for the regular version.


Further Reading/Bibliography
  1. Eagleson, Janet & Hasner, Rosemary, The Maple Syrup Book, Erin, Ontario, Boston Mills Press, 2006
  2. McGee, Harold, On Food and Cooking: The Science and Lore of the Kitchen, New York, NY,Scribner, 2004
  3. http://shepherdmaplesyrupfestival.org
  4. http://www.blacksheepsugarhouse.com

Sunday, March 14, 2010

3.14159, We love Pie!

Happy Pi day!  What better way to celebrate pi day than with a slice of pie.

The pie is synonymous with Americana as illustrated by the phrase “as American as apple pie.”

A New York Times article written in 1902, simply titled “Pie” goes on to say:
“Pie is the American synonym of prosperity and its varying contents the calendar of the changing seasons.  Pie is the food of the heroic. No pie-eating people can ever be permanently vanquished.”
Even though pie makes so many people happy, less and less people are actually making it at home for fear of screwing something up that means so much to us.  On the contrary, pie is a rather simple dish to make or, pardon the pun, it’s as easy as pie.

So, on this March 14th, go have a slice of your favorite pie, and try your very best to make it a home made slice of pie.

The History

Pie can be traced back to ancient Egypt, around 9500 BC, as pockets made with oats, barley, wheat and rye filled with honey and baked over coals.  The pastry shell tended to be more of a serving device, baking dish, or storage/preservation.

For many years, pies were really more of a show than a delicacy.  Pies often contained live birds, turtles, rabbits, frogs, even little people would be in the pie and would come out as soon as the top was cut.  This where the rhyme “Four and twenty blackbirds baked into a pie….,” comes from.

When the pilgrims landed on Plymouth Rock, they also brought with them their family pie recipes.  It is in America they started using fruits and berries, basically using what the land provided them and what the Native Americans introduced to them.

Well into the 1700s, the pioneers served pie with every meal, making it an American icon.  Different regions of the country have come up with their signature pie.

The Science

A great pie crust is defined by both its flakiness and tenderness.  These two concepts counteract each other in the production of the crust.  Flakiness is formed when large pieces of solid fat occupy space in the dough and are separated flour.  On the other hand, when the fat is more evenly distributed, a more tender crust is created.

The type of fat is an important factor in creating the tenderness/flakiness.  The longer the fat stays solid, the flakier the crust will be, so keeping it cold until it goes in the oven produces best results.  Lard, shortening, margarine  or butter are the usual fats of choice in pie dough.  The melting temperature of the fat dictates how long it will stay solid while the dough sets producing a flakier crust.  Butter, being only 80% fat, has a lower melting temperature than shortening, but has a more desirable flavor and mouth feel.  On the other hand, shortening has a higher melting temp, which makes it easier to work with and produces a flakier crust.  Lard has a negative reputation since it is conceived to be a lot less healthy.  Saturated fat and trans fatty acids do raise a persons cholesterol, but it is found that butter and, even more so, margarine are actually higher in these than lard is.  As a matter of fact, lard is found to have larger amounts of mono and poly unsaturated fats.  Many people swear by insert fat type here in their own pie crust recipe

The type of flour used is another important factor in creating a great pie crust.  The formation of gluten in a crust makes it tough and eliminates the tenderness/flakiness of the crust.  Most bakeries use pastry flour in their crust production which has a lot less protein in it than all purpose flour (and maybe a tad more than cake flour).  The more the dough is worked, the more gluten is produced.  Water is also a good gluten producer when mixed with flour.  When making something out of paper Mache, such as a piñata, the glue that holds it together is a simple mixture of flour and water, or gluten.  Fat and sugar act as tenderizers, that is they minimize the formation of gluten.  Acids break down the protein strands which also make them good anti gluten candidates (which is why vinegar is sometimes found in a pie crust recipe).

Liquids help make the dough hold together and more pliable when rolled out.  This liquid can come in many forms.  Ice water is the foremost type of liquid used; it is cheaper and more easily acquired.  Browsing through different recipes, liquid comes in many other forms.  Cream, sour cream, cream cheese and eggs provide liquid as well as fat.  Alcohol is another good form of liquid, it moisturizes the dough without forming gluten and it evaporates away in the baking process.

The color of the crust adds to the eye appeal of it. Sugar and protein make the crust browner, while acid makes the crust appear paler.  The type pie may govern the brownness of the crust, for example the rich darkness of a nice pecan pie might make a good brown crust look burnt, so a paler crust might be more desired.

Keeping all this in mind, some bakeries differentiate their crust by the type of pie being made.  An old fashioned double crust pie might have a different recipe for the bottom of the pie than the top.  A mealy dough has the fat more integrated into the flour and can avoid absorbing moisture from a particularly wet filling preventing it from becoming soggy which makes it a great bottom crust dough.  A flaky dough, with larger pieces of fat is a good technique for making a top crust.

The Technique

A very basic recipe for pie crust is a 3-2-1 dough.  That is three parts flour, two parts fat and one part liquid.  This recipe is usually altered with the addition of sugar and/or salt to add flavor.

To make the dough, start by cutting the fat into the flour.  This can be done by hand, a pastry blender, two knives, food processor or even rolling the two ingredients together on the counter with a rolling pin.  Add liquid, sugar, salt, egg, etc and mix being careful not to handle the dough too much and avoiding over mixing.  Once together, the dough should hold together nicely when squeezed.  Form the dough into balls or patties, wrap in plastic wrap and store in the refrigerator for at least 30 minutes.  This allows the fat to reharden and the liquid to evenly distribute itself throughout the dough.  Roll out the dough on a floured surface to a uniform thickness.  When rolling, don’t roll of the edge, that tends to thin it out more than the rest of the dough.

 Blind baking the crust, that is prebaking it without a filling, makes it crispier.  To do this, preheat the oven to 400° F, while waiting, poke holes at the bottom of the crust so trapped air won’t puff up and blister the bottom (this is called docking the crust).  Place a piece of foil or parchment paper inside the pie and fill it with uncooked beans, rice or pie weights.  This also aids in making sure the crust doesn’t blister.  Bake the crust for 10 minutes. Remove the crust from the oven and remove the pie weights.  Place back in the oven for another 10 minutes.  You now have a nice golden brown and delicious pie crust.

Berry pies are often covered and don’t usually need the blind baking method.  After the pie is filled, make sure the top crust is perfectly sealed onto the bottom crust.  This is where artistic impression can be made around the edge or even on top of the pie.  Some people put decorative cut outs from the scraps on top.  It is also important to cut stem vents on the top crust.

Another object that is decreasing in popularity is the pie bird, or pie funnel.  This functional adornment has been used since Victorian times to function as a steam vent thus preventing the filling from boiling over and spilling all over the oven.  Pie birds also help support the middle of the top crust to prevent it from sagging while baking.  They’re usually made of ceramic and come in many shapes.  The most popular, which is its namesake, is in the shape of a blackbird, paying homage to centuries past when birds were really part of a pie.

The Dishes

Basic Pie Dough Recipe

Weight
Volume
Flour
5 oz
1 2/3 Cups
Butter
3.5 oz
½ Cup
Water, cold
1.5 oz
2 ½ Tbsp
Salt
Pinch
Pinch
Sugar
¼ oz
½ Tbsp

Sift the flour into mixing bowl.  Cut in butter.  Dissolve salt and sugar into water.  Add the water solution a little at a time until dough hold together.  Do not over work.  Wrap dough in plastic wrap and refrigerate for at least half an hour.


Pies:  How can I pick only one pie recipe?

Hybrid Pecan Pumpkin Pie
This first one is a recipe I thought of at around Thanksgiving.  I love pumpkin pie, I love pecan pie, why not combine the two.

Pumpkin Pie Filling
Pumpkin puree
13.25 oz
Pastry flour
0.5 oz
Cinnamon
0.12 oz
Nutmeg
¼ tsp
Ginger
¼ tsp
Cloves
1/8 tsp
Salt
0.06 oz
Brown Sugar
5 oz
Eggs
5 oz
Corn Syrup
0.5 oz
Molasses
0.5 oz
Heavy Cream
½ pint
  1. Place the pumpkin in the bowl of a mixer fitted with the whip attachment.
  2. Sift together the flour, spices, and salt.
  3. Add the flour mixture and sugar to the pumpkin. Mix at second speed until smooth and well blended.
  4. Add the eggs and mix in. Scrape down the sides of the bowl.
  5. Turn the machine to low speed.  Gradually pour in the syrup, molasses, then the cream.  Mix until evenly blended.
  6. Let the filling stand for 30-60 minutes.
Pecan Pie Filling
Granulated Sugar
3.5 oz
Butter
1 oz
Salt
1/8 tsp
Eggs
3.5 oz
Dark corn syrup
6 oz
Vanilla Extract
0.125 oz
Pecans
2.5 oz
  1. Using the paddle attachment at low speed, blend the sugar, buter, and slat until evenly blended.
  2. With the machine running, add the eggs a little at a time until they are all absorbed.
  3. Add the syrup and vanilla. Mix until well blended.
Assembly
  1. Fill the pie shell half to ¾ full of pumpkin pie filling.
  2. Bake at 450ºF for 10 minutes.
  3. Place pecans on top of pumpkin custard and pour in Pecan Pie Filling.
  4. Bake at 450ºF for an additional 5 minutes.
  5. Reduce heat to 350 ºF and bake until set, about 30-40 minutes more.
Lemon Meringue Pie

Lemon Curd (makes 5 cups)
Whole Eggs
8
Sugar
1 ½ lb.
Lemon juice
1 ½ Cups
Lemon zest
From 8 lemons (in large pieces)
Unsalted butter
12 oz
Corn starch
1 ¼ oz
Cold water
3 Tbsp
  1. In a stainless steel saucepan, whisk together the eggs and sugar until well combined.
  2. Add the lemon juice and zest, combine.
  3. Cut the butter into pieces and add to the mix
  4. Place over medium heat stirring constantly until the mixture comes to a boil, remove from heat.
  5. Combine the corn starch with cold water to dissolve.
  6. Return the pan to medium heat, add the corn starch and stir constantly until the mixture comes to a boil.
  7. Strain the mixture to remove the zest and refrigerate.
Swiss Meringue
Egg Whites     4 oz
Sugar              ½ lb

Place the egg whites nad sugar in a stainless steel bowl or in the top of a double boiler.  Beat with a wire whip over hot water until the mixture is warm (about 120∞ F or when the sugar dissolves).
Transfer the mixture to the bowl of a mixing machine.  Whip it at high speed until stiff peaks form and the meringue is completely cool.
Fill the pie shell with lemon curd and cover with meringue.  Place pie under broiler until meringue browns.


Further Reading/Bibliography
  1. Corriher, Shirley O., Cookwise: The Hows and Whys of Successful Cooking, New York, NY, HarperCollins, 1997
  2. Gisslen, Wayne, Professional Baking, Hoboken, New Jersey, John Wiley & Sons, Inc., 2009
  3. “Pie” New York Times 3 May 1902: 8
  4. http://whatscookingamerica.net/History/PieHistory.htm

Sunday, February 21, 2010

My Dark Addiction

As Harry Potter is returning to Hogwarts for his third year, the guardians of Azkaban the dreaded Dementors, are searching for the escaped convict Sirius Black.  As the train stops, not yet at its final destination, a sudden chill comes over the passengers of the Hogwarts express.  The Dementors are searching the train.  Unexpectedly, Harry has a rather severe reaction to the Dementors ultimately passing out.  When he reawakes Remus Lupin gives him a treat to counteract the effects…chocolate.

Chocolate has been found to be the most craved food item.  It seems to give the consumer a moment of elation that warms the entire body.  The dark silky goodness has a melting temperature is about 97°F (a person’s body temperature is 98.6°F).  Getting hold of a nice little piece of dark chocolate and just letting sit in the mouth melting away is close to heavenly bliss (chewing it almost seems to be a sin).

It wasn’t always the solid confection we know and love today.  Montezuma, emperor of the Aztecs used to drink almost 50 cups of “chocolatl” or “xocoatl” in which cocao beans were ground into a paste and mixed with chile, vanilla, honey and other spices.  It was believed to be part health drink, part aphrodisiac.  Predating the Aztecs, the Mayans believed their tree “cacahuaquchtl” was the food of the gods.  In greek, “food of the gods” translates to theobroma, so the tree that gives us this mouth watering morsel is the cacao tree or Theobroma cacao.


The History

The evergreen tree Theobroma cacao is native to southern Mexico and northern South America.  The fruit of the tree, or pods that grow straight from the trunk, produce a sweet, sticky white pulp that attracts the native animals.  This pod also produces about 30 to 40 seeds, which are discarded by the animals, dispersing them which sprouts more trees.  It is these seeds, or beans, that have become renown throughout the world.

The first people that are hypothesized to use the bean from T. cacao are the Olmecs who lived in southeast Mexico around 1000 B.C.  It isn’t really known why or when the Olmecs started cultivating what they called kakawa which is where we derive the word cacao (pronounced ka-KOW) which is used today.

The Olmecs introduced kakawa to the Mayans who inhabited the same area between 250 and 900 A.D. They used cacao as currency and brewed them into a foamy drink enjoyed only by Mayan royalty and in religious ceremonies.  They in turn passed it on to the Aztecs who lived further north.  The Aztecs also used the cacao beans as currency as well as making it into a drink by roasting them grinding them to a powder then added to water and whipped to make the drink foamy.  The emperor Montezuma was known to drink 50 glasses of chocolate a day (to “help” him with his harem). Both the Aztecs and the Mayans were known to flavor their chocolate drink with aromatic flowers, vanilla, chile, wild honey, and achiote ( also known as annatto, a spice native to the area used as a flavoring and a colorant, it turned the chocolate into a red color resembling blood).

When Hernán Cortés arrived, to eventually wipe out the Aztecs, he was introduced to cacao.  Since he conquered many areas including the Caribbean, it wasn’t long before the Spaniards started mixing the cacao with sugar.  In around 1650, chocolate had found its way into Italy, France and England, but was still in the form of a beverage.

Any attempt to enjoy chocolate in a solid form was futile as it was crumbly in texture. Conrad van Houten, a chocolatier in Amsterdam, discovered a way to extract cocoa butter out of the chocolate leaving the solids and creating cocoa powder.  The cocoa butter was at first thrown.  It was eventually added into ground cacao beans and sugar and the first “eating chocolate” was introduced in 1847 by the English.

In 1876, Switzerland made important contributions to the production of the solid chocolate we know and love today. Daniel Peter used Henri Nestlé’s invention of dried milk powder to produce a solid milk chocolate.  A couple of years later, Rudolphe Lindt invented the conche, which give the chocolate its silky smooth texture.

Chocolate in this form, eventually found its way into the new world.  In 1900 Milton Hershey started producing milk chocolate bars in bulk, lowering the cost of a chocolate bar.  Mr Hershey eventually convinced the U.S. Army to start supplying his bars in a soldiers ration pack.  As World War II had broken out the U.S. Army had posts all over the world increasing the popularity of the Hershey bar.

In 1911, Frank C. Mars and his wife Ethel V. Healy started their candy making company in their kitchen.  This eventually leads to the other chocolate giant, Mars, Inc.

In 1994 a Chocolate War in Europe had erupted.  The EU was defining food standards and eventually worked its way to chocolate.  Belgium, France and Germany didn’t want anything lower than 50% cocoa to be called chocolate.  This was met with huge opposition by England, more specifically, the Cadbury company, who produces chocolate candy with only 10% cocoa.  Germany’s milk chocolate companies eventually persuaded the German government to change its mind which was enough for England and Cadbury to win their argument.  Anything with more than 1% cocoa can be called chocolate, but as a stipulation these companies must put the amount of cocoa on their labels.

The Production

The pods of the cacao are harvested twice a year.  The trees are too fragile to climb so the harvesters are wielding machetes.  The beans are removed from the pod by hand so they don’t get damaged.  The beans are then fermented in between banana leaves until most of the moisture is gone.  This process also changes the beans color from yellow to brown and develops the flavor within.  The better quality the beans are, the less time they need to ferment.  Then they dried completely and are shipped to processors.

The beans are washed then roasted at a temperature of 210°F to 290°F.  They are then cracked and the outer shell is removed.  The left over cacao, called nibs, are then ground into a paste, or chocolate liquor (nope, there’s no alcohol in it), or cocoa mass.

The processor now splits up the cocoa liquor and sends it to different rooms depending on what the end product is going to be.

In one room, the liquor is put into a hydraulic press separating it into cocoa butter and cocoa solids.  The solids are ground up into cocoa powder.  Since cacao is naturally acidic, the cocoa powder is sometimes Dutch processed, in which alkalis are mixed to neutralize it (so in baking, Dutch process cocoa powder won’t react with baking powder so compensation for that will have to be made by adding more acid).

The cocoa butter will either be mixed with sugar and milk powder which forms white chocolate or will be packaged as is.  Cocoa butter is used in capsules in suppositories and oral medication because it can hold its shape, is stable and is an inactive ingredient.  Cocoa butter also has a moisturizing effect which makes it ideal for lip balms or other moisturizing creams.

In the other room, the cocoa liquor is mixed with more cocoa butter and sugar to form dark chocolate.  The addition of milk powder makes it into milk chocolate.  From here, the chocolate is defined by its chocolate liquor content.  Milk chocolate contains as little as 10% liquor while semisweet or bittersweet chocolate varies between 35% and 84% liquor.  Anything greater than 85% is considered unsweetened.

This chocolate mixture now has to be refined to get its definitive smooth texture.  In order to do this, a procedure called conching is used.  In the first stage moisture is removed, while in the second stage cocoa butter is added back into the mixture and is ground, mixed and churned for hours or days depending on the desired quality (the longer the conching the higher the quality).

After the conching process, the chocolate is tempered in order to get the nice shine and proper texture.  The types of fat vary within the cocoa butter, this variation in fat means that the specific melting temperatures vary as well.  The fats with the higher melting points have a more stable molecular structure and therefore are the higher quality fats.  These are the ones that give the chocolate its shine and its snap.

To temper the chocolate properly, all of the fats must first be melted.  This happens between 122° and 131º F.  This is best done over a double boiler instead of direct heat because chocolate burns easily.  Cooling or precrystallization happens next by letting the chocolate cool down to between 80° and 84° F.  Bringing the chocolate back up to between 86° and 89° F thins out the chocolate so it’s usable without melting all of the fats.  If the chocolate gets hotter than 89° F in this last step, the entire tempering process needs to be started over again.

The Science

It was once thought that chocolate might contain psychoactive chemicals that make it addictive.  Looking deeply into chocolate, it contains minute amounts of anandamide, a“cannabinoid” chemical, that is also found in marijuana.  Chocolate also contains theobromine, which is an alkaloid, and caffeine, both of which are psychoactive molecules.  As it turns out the amount of these chemicals are so small that it will take many pounds of chocolate to become addictive.

Chocolate also contains a high amount of phenylethylamine.  Phenylethylamine has the capability to release dopamine into the pleasure center in the brain.  Falling in love and feeling passion has the same reaction.

Not only does chocolate make you feel good, it’s good for you.  Chocolate contains many antioxidants in the form of flavonoids, more specifally: epicatechin.  It is believed that falonoids decrease the risk for cardiovascular disease.

Antioxidants also help keep the amount of free radicals in our body from getting too high.  Free radicals are molecules that contain atoms that have an unpaired electron, which means it’s always seeking to bond with something to make it complete.  This can be harmful to the cells in our body.  The darker the chocolate bar you eat, the more antioxidants are consumed.  Milk and sugar tend to dilute the chocolate.

The Dish

Chocolate truffles were first made as a confectionary equivalent to the truffle fungus.  Chocolate truffles are made with a ganache center and covered in chocolate.  Many flavorings can be added to the ganache and it can have any number of outer coatings.  The basic truffle is dark chocolate ganache covered in dark chocolate then powdered cocoa.

Ganache is a simple dish that features chocolate.  In its basic form, ganache is cream and chocolate.  Flavors can be added as an accent, can be whipped to lighten or butter can be added to increase its richness.  Ganache can be used as a filling for truffles, cakes and other pastries. When still warm, it can be used as a glaze, icing or a sauce.

The Recipe
Bittersweet Chocolate, chopped
1 lb
Heavy Cream
12 oz
Tempered Dark chocolate
As needed

Method:
Heat the cream and pour over the chopped chocolate constantly stirring so it melts evenly.

Variations:
Separate the ganache into separate, equal parts.  In my case I separated it into four parts and added a different flavor to each: lavender, Kirsch and cherry flavor for a Black Forest truffle (I also added a dehydrated cherry in the middle), Grand Marnier, raspberry preserves.

Chill the ganache until firm.  Scoop the ganache into 2 tsp. mounds, roll into balls and chill again.  Melt and temper dark chocolate and prepare additional toppings.  Enrobe the ganache balls in the tempered chocolate and, if desired roll into additional toppings.

Note:  I made a fifth flavor using a combination white chocolate and milk chocolate ganache for a creamy German chocolate truffle, which were rolled in toasted coconut and pecans.


Further Reading/Bibliography

Monday, December 7, 2009

Get Crackin'

A box without hinges, key or lid,
Yet golden treasure inside is hid.

This is one of the riddles used by Bilbo Baggins as he was trying to outsmart and escape the underground home of Gollum.  He was, of course, describing eggs.  It’s interesting how this is in the very same chapter he happens to find The One Ring.  Eggs are certainly “my precious”.

The egg is the quintessential symbol of life.  In one form, a perfect little package of proteins eventually becoming a living creature.  In another form a little box of nutrients providing for the sustenance of other beings.

There are so many things an egg can do that I couldn’t just write one entry about them. 

The Background

The egg has many virtues in the kitchen.  Its many qualities lend towards giving one dish dense richness while in another dish can provide light airiness.  The most common egg is the chicken egg. 

The chicken’s closest ancestor is a jungle bird from tropical and subtropical Southeast Asia and India.  It was here that it was most likely first domesticated, which is believed to be around 7500 BCE.  From there, they were taken to Egypt around 1500 BCE, then to Greece in 800 BCE then to Europe around 600 BCE.  It is believed that Columbus carried the domesticated chicken to the Americas on his second voyage in 1493.

The chicken is one of the birds that will keep laying eggs to keep up a quota to make up for predators stealing an egg or two. The egg’s size, color and flavor depend on breed of chicken and her diet.

The egg from the Single-Comb White Leghorn is bred for egg laying production in America.  Their coops are kept rooster less so the eggs remain unfertilized.  The white egg we all know at our grocery stores is produced by the Leghorn, whereas the most common brown egg is produced by the Rhode Island Red.  Other than the color, there is no difference in flavor, makeup or nutritional value between the two.


The Anatomy

The egg has many layers that make up the perfect little package.

The main part of the egg is called the germ cell.  This is the white dot seen at the top of the yolk.  This is the part that contains the genetic information from the mother hen.

The yolk is the sustenance for the germ cell.  If the egg were fertilized, this will be the food source for the growing embryo.  The yolk consists of mostly fats and proteins. Over 33% of the eggs weight is in the yolk.  It carries most of the iron, thiamin, and Vitamins A, D and E.  The yolks color is dependent on the diet of the hen.  Alfalfa and corn feeds produce xanthophylls which give the yolk the yellow pigment. To break it down a little more specifically, the yolk is made up of 49% water, 32% fat, 17% protein and 2% of other minerals.

The white, called the albumen, is the clear substance that protects the yolk.  The part that holds the yolk in place is the chalazae.  This is an elastic cord that is anchored to the walls of the shell.  It prevents the developing embryo from contacting the shell which could deform the growth.  Then there are four alternating layers of albumen surrounding the yolk that are alternating between thick and thin in consistency.  The albumen also forms an air cell at the blunt end of the egg.  This would in effect give the hatching chick its first gulps of air.  The break down of the albumen is: 86% water, 12% protein, and 2 % minerals, fatty material, vitamins and glucose.

The shell is the box that encases the little treasure.  Its calcium carbonate make up is held together by a matrix of proteins.  The main functions of the shell are to keep moisture in and bacteria out.


The Quality

The USDA keeps an eye of the quality of the eggs produced. They have defined three different grades: AA, A and B.  Egg grades are determined by the breakout method or by candling.  The breakout method is a destructive method in which the actual egg is broken and measured.  This method uses the Haugh unit (named after Raymond Haugh, who suggested the method) to determine the grade.  The Haugh unit is a ratio of the height of the albumen to the weight of the egg.  The lower the height of the albumen, the lower the grade.


Grade AA Egg
Grade A Egg
Grade B Egg

Candling is a non invasive way of inspecting the egg.  It is done by holding up the egg in front of a light source to inspect the clarity and quality of the albumen and the size of the air cell.  Fertilized eggs are usually caught by these methods as they would show different densities and imperfections in the albumen.

The Science

Given the make up of the eggs as noted in the anatomy section, a whole egg is 73% water and 13% protein.  These proteins that are floating around in the water almost look like tangled little balls of yarn.  As the egg heats up, the molecules start moving at a higher rate, much like a pot of water starting to boil.  As the protein molecules move faster, they start to unravel forming long strands.  Each long strand starts to bond with other protein strands creating a larger three dimensional net.  This net encompasses the remaining water like a sponge.  If there were anything else added to the egg while it was cooking, (for example, onions) they too would become part of the mesh.

The Methods (out of shell)

So you get to the kitchen ready to make breakfast, or brunch perhaps or maybe even the best of all, brinner.  You’ve got a bunch of eggs and a rash of bacon in the ‘fridge and you’re trying to figure out how you want to prepare the eggs.

The first thing that comes to mind is fried eggs.  Getting the pan to 250°F is ideal.  A good way to tell is when the butter stops sizzling but doesn’t brown if you’re using oil it should shimmer.  At this high temperature, you gain flavor while sacrificing a little tenderness. Cracking each egg into a separate dish to make sure the egg looks okay and you don’t break the yolk.  Once the pan comes to temp pour the egg(s) in and season with salt and pepper.  The once clear albumen becomes white and a nice crisp edge starts to form.  Serving the eggs now will result in Sunny Side Up.  The yolk is still a little runny, so you can dip your toast in them.  Flip them over or pour a little water in the pan and covering and letting them sit for about a minute will result in eggs over easy.  The yolk will still be a little runny and it will have formed a crispy cover.  Let them sit a little longer, about another minute or so and they will be eggs over medium.  The yolk will be a little more solid yet creamy. A little longer than that and you guessed it, they’ll be eggs over hard.  The yolk will be completely solid.

If you’re like me, you prefer your eggs scrambled. The mixing of both the white and yolk together make a great flavor.  Sometimes people add something to the mixture; cream, milk, water etc.  This addition dilutes the proteins, which makes the eggs a little more tender. Warm the pan until a drop of water dances on the oil or the butter starts to bubble.  Pour the eggs in carefully as to not splash the hot fat.  If you like larger curds, let the egg sit for a while before stirring, smaller curds, start stirring sooner.  Because of carry over, the eggs should be removed from the pan while still a little runny.

An omelet is also made from the same mixture of whites, yolk and extra liquid.  This time, the pan should be hotter as to set the egg proteins sooner.  The name omelet ultimately comes from the Latin word lamella, which means “thin plate”.  This describes the formation of the egg as it’s done cooking.  It also refers to the endless possibilities of toppings you can put on your little egg plate.  Usually an omelet contains three eggs which are poured into a well oiled (or non-stick) pan.  There are a couple of methods of what to do from here.  Stir until curds are formed then distribute them into the plate shape letting them sit for a while to let the bottom set.  Another method is to pour in the egg mixture and letting the bottom set in the beginning.  Scrape up the egg and tilt the pan to let the still liquid egg touch the hot pan.  You can now fill it with your toppings, fold and serve.

My sister happens to like the breakfast sandwich specifically made with an English muffin and a poached egg.  This is done simply by putting the egg in a pot of simmering water.  The trick is keeping the egg in a compact shape.  Using a grade AA  is best for poached eggs since they keep their shape easier. Some people aid this by putting a little vinegar in the water.  The acid coagulates the proteins a little quicker thus setting the egg a little sooner so as to not allow the egg to spread out.  Other people don’t like this because it makes a funny film over the egg.  Others drain the thin white, leaving the stronger thick white to hold the shape.

My friend Amy has an excellent recipe for roasted eggs on her blog: http://thefabulousbakergirl.wordpress.com/2009/08/24/ode-to-julia-baked-eggs-in-ramekins/

This method is also called eggs en cocotte, or shirred eggs.  Done slowly on the middle rack in a water bath, these eggs come out so creamy it convinced Amy to like eggs again.

The Dish

For my example, I made a frittata.  A frittata is an Italian omelet filled with other ingredients.  It can be compared to a Spanish tortilla or a crustless quiche.  It is usually cooked in a frying pan then slid onto a plate and the still hot frying pan inverted over it to finish cooking the top.  A more conventional way is to finish cooking it in a 350º F oven.

The slowness of the cooking keeps the egg moist and creamy.


The Recipe

Ham and Potato Frittata

Olive Oil
3 Tbs
Butter
1 Tbs
Shallot, minced
1
Yukon Baby Gold Potatoes, sliced
4 or 5
Ham, cubed
¾ Cup
Eggs
8
Salt and Pepper
To taste

Preheat oven to 350. Heat oil and butter in a 12 inch nonstick pan.  Briefly sauté shallot. Sauté potatoes with shallots until golden brown and delicious.  Add ham.  In a separate bowl, whisk eggs until thoroughly scrambled.  Arrange potatoes and ham on the bottom of a pan to make one even layer. Pour in eggs and let the bottom set up, about 1 to 2 minutes.  Finish in the oven until top is set, another 1 to 2 minutes.  Remove from oven and let carry over heat finish cooking.  Slice and top with lentils and chopped olives.


Lentils

To cook lentils, simply pick over to remove debris or shriveled lentils, rinse, and drain. Cover with water or broth and boil for 2 to 3 minutes (to aid in digestion). Reduce heat and simmer until tender. Depending on the variety and age, cooking time may take anywhere from 10 minutes to 1 hour. [http://homecooking.about.com/od/howtocookvegetables/a/lentiltips.htm]


Further Reading/Bibliography

  1. McGee, Harold, On Food and Cooking: The Science and Lore of the Kitchen, New York, NY, Scribner, 2004
  2. Gisslen, Wayne, Professional Baking, Hoboken, New Jersey, John Wiley & Sons, Inc., 2009
  3. http://www.incredibleegg.org
  4. http://en.wikipedia.org/wiki/Egg_(food)
  5. http://www.ars.usda.gov/research/publications/publications.htm?seq_no_115=170209
  6. USDA Egg Grading Manual, 2000